
Installing a split system air conditioner requires precision, experience, and the right tools. While DIY tutorials may make it look simple, professional HVAC installation ensures your system performs efficiently and safely.
1. Choosing the Right Location
The indoor unit should be positioned where airflow is evenly distributed without obstruction. Outdoor units must have proper ventilation and minimal direct sunlight.
2. Mounting the Indoor Unit
Technicians mount the indoor unit on a secure bracket, drill a small hole for piping, and ensure the system is perfectly level to prevent water leaks.
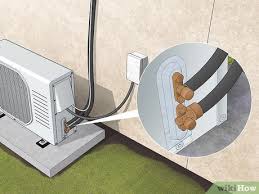
3. Connecting Pipes and Wiring
Copper pipes, drainage hoses, and electrical wiring connect both units. This step requires sealing, insulation, and pressure checks for safety and efficiency.
4. Vacuuming and Testing
Air and moisture are removed from the refrigerant line before gas is released. The technician then powers up the system, checking performance and temperature balance.
Conclusion: A proper installation extends your system’s life, reduces energy waste, and ensures better cooling performance. Always choose a licensed HVAC technician for your split system installation.
← Back to Blog